Showing posts with label lifehack. Show all posts

Friday, May 16, 2025

PCSX2 setup on PC

 Its possible to setup PCSX2

Have your game ROM ready to roll.

1. Go to official PCSX2 download installer.

2. Dump BIOS into the bios folder. Find a reliable BIOS file.

3. Set where your ROM file path is.

4. check your controller mapping/setting or use keyboard default.  Launch ROM.


Viola here we go. Relive your younger gaming years. Cheers.


Here is how BIOs file should look like. google up for a reliable source of it.


Monday, January 18, 2021

Hello Hellogold , Bye

Was trying out Hello gold last year. By luck i guess ,i dumped a bit more within Oct/Nov . Now the price is declining back. So reap the sow first. Then wait for price to dip further down if i want to buy again.


Making RM70 bucks not a big deal , but mathematically 12% for just dumping deposit in for couple of months;  not bad and also using some Boost voucher to get reduced charge over 3 months if i remember correctly.

So Hello gold charges some fees yearly too. And also included some slight charges when you deposit, withdraw. Transferring back to bank doesn't charge anything. Got my first withdraw in bank already.


And notice the Buy and Sell gap is pretty high. It's not stock , but the platform is making quite a cash via transactions in/out.

So i'll park and observer first. 
Accumulate some capital for investments opportunities.


Friday, January 25, 2019

Cheap Parking after 5pm KLCC (Convention center)

It's the time of year and company annual dinner is held at KLCC convention center again. This time round I drive earlier into the block right in front of KLCC that a friend told there's an open space parking near Novotel/Hakka restaurant.

The open space parking is really expensive RM4 per hour and flat rate RM8 (if I remember correctly) after 6pm. I asked if I could exit and yes I can.


Then I saw the board as I pass in front of Novotel hotel.Probably the cheapest after 5pm parking  I ever seen in this area.


This is most cheap and nearest to klcc so it's really suitable for function/night visit if you are  up for a walk towards suria klcc.Novotel is just the next block from Wisma Uoa which is right opposite KLCC.

Unrelated to the post; found myself lucky drawed this while I was busy mixing my rojak at the food station. What a fortunate turns of events.


Friday, August 18, 2017

7 habits of highly effective people by Stephen Covey


Nice sharing below;

1. Be proactive - ok, they suck. but that doesn't help me
2. Begin with the end mind
3. Put first things first
4. Think win-win
5. Seek first to understand, then to be understood
6. Synergize
7. Sharpen the saw


Saturday, June 3, 2017

Bye bye Streamyx, Hello Webe broadband

For TLDR scroll all the way to bottom.

About 2 months back, if my memory serves me right we got mail (yes actual real mail) from TM announcing discontinuation of all Streamyx broadband service from Nov17 this year.


Meaning that our cheapo Streamyx will be out of service soon late this year and either we go for Unifi at ~RM100 + more each month or find alternative broad band solution. For only light use, Unifi is a bit overkill as we spent >12 hours at work each day.

It so happens that one heavy rain day few days back, lighting​ struck and zapped out our modem...oh dear..so a quick decision needs to be made.


1. Sign up for webe broadband 10G bonus +20Gb limit currently online at RM 59 per month. Not bad but need to buy the Wifi Modem at ~RM20x++. No bonding contract , I like it and an advance payment that will be used to offset first month payment..can't really trust next day delivery as this is not US we are talking bout. (Updated: as of 1-June the 10Gb bonus offer is no longer available).


2. Terminate Streamyx and phone number by walk in to main TMpoints. (Kelana Jaya)

Long story: Terminate TM Streamyx + phone number. This one needs to walk in to main branch of TMpoints ,give their hotline a call at 100 be very patient in waiting to verify the branch that can process this. Have your TM Streamyx account in hand, they need to verify your IC once you fill in a simple form and submit. Pretty easy if you have no outstanding to pay. TM will take 14 days to process termination, charge you service of that period (ridiculous!) And mail back a check with your balance deposit paid during package sign up registration.

PS: I called 100 asking if I can terminate my line & Streamyx and the operator dumbly took my account number, check and after some ding dongs told me, sir you can't terminate via hotline. Oh dear, why you no say so when I first asked (my very first question?!?!)

3. Contact webe via online chat. Got delivery number and keep pestering for them to deliver within their 1-3 days promised time. Next day delivery my foot ha!

The courier line clear under packet one aka webe hotline is +603 5990 5990


Long story: Now webe doesn't have a hotline. They have this online support on web. Which gives you second thoughts on their support sincerity. Hi sir, how can I help you? :)...pls don't smiley face me if you don't mean it. First operator refused to give me a number to contact the delivery team , Line Clear. Was promised they will deliver the next day but didn't happen. Gave them another call luckily they do half day delivery on Saturdays. Please have Line clear tracking number ready, it's the 6 digit number that operators say starts with Webe word. Some operator can actually check by your application IC, so I guess that depends on their Intelligent check (sorry, fallout pun here haha)


4. Upon receiving setting up is really simple. Unbox, plug in sim and battery. Install Huawei Hilink app to update password and monitor usage if need to on your smartphone. Power on and use directly. This is probably the best part here. Fuss free from received to start using. For a small saving, subscribe to auto payment using credit card and get RM2 off each month.


TLDR, Streamyx modem get zapped by lighting. Ditched the plan for a webe broadband plan. Shared how to terminate streamyx and phone number, order and follow up webe broadband delivery. Now let's see how is webe broadband performance, so far it's pretty decent..hopefully not too congested in my area.

Tuesday, May 30, 2017

Withdrawal from kwsp/epf

First there are a few stages to withdraw. Here we only start withdrawal process after bank loan secured and paid 10% down payment for our secondary purchase.

1. Request a kwsp format loan statement at your bank by walk-in application. For Maybank we don't need to bring any specific doc except to verify with our ID. This one takes about 5-10 days processing time. Please make sure the statement has a bank seal (round chop).


2. Bring this document to kwsp branch, in my case I choose Kajang jln Reko branch. You can also print your latest statement and bring along. No need any form filling.


Link

At this point, I took number and went to counter. The bank statement check is the one that stumped me, as the lady in charge politely tells it needs a bank round seal stamping. There is no space or writing stating it's needed but it's what kwsp checked.

So I took a detour to nearest jalan tukang Maybank and luckily the person in charge helped out by stamping on behalf. Take another trip back, no need to take number this time, just approach the lady that served me just now and we are done after fingerprinting her receipt document and giving me a customer copy. I need to give Maybank a call on how to handle kwsp's dis bursement. Pretty strange huh...

Anyway, for first time epf withdrawal we just need kwsp format bank loan statement and current own kwsp statement. If you didn't print the statement, it's available at kwsp branch, just login to the kiosk machine and print a copy with help of a staff of course.

For second time withdrawal , we can apply it online via kwsp's i-akaun. So it's pretty convenient, but after this lump sum withdrawal my account 2 will be quite dry for a while..


Friday, January 13, 2017

Swap your own T8 flouroscent to LED T5 lamp


Since young time, i rarely see my family fix anything at home, leaking tap /pipe or broken lights all also hire people. 

Today everything very expensive, but we live in ICT era where information is easily accesible via Mr G(oogle) and there is MR DIY everywhere. For a flourescent light with old legacy style fixture (the holder), i called one contractor and he quoted RM60 together with purchase of lamp. That is ~RM4x for installation work along, that also considering that he is willing to do swapping of 2-3 sets of flourescent light, some might even refuse because not much to earn ma.

First of all, safety is most important. Electrocuted dude, is not a happy MR DIY.

Get a Voltage Detector, this one runs on AAA battery. Just turn on light switch & watch the LED & beeper goes wild. That is to detect the live wire since cabling standards can be quite messed up depending on what the contractor likes at the time of installation.

Have to use this thing for nerdy/noobie people that just start DIY, better be safe than shocked.


Even went to MR DIY to read some manual of rewiring T8 fixture to use T8 tubes on old fixtures.

Even google up what is ballast, fuse and fixtures during the process. 

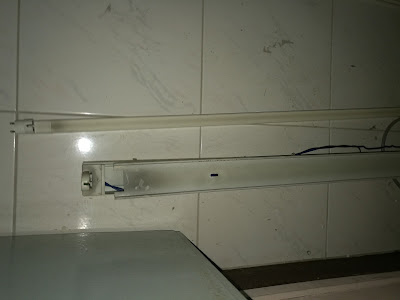
First attempt didn't go so well. Figured out how to unscrew fixture & dismantle it. This is some weird classic T8 fixture and in it slotted with a T5 fixture to accomodate T5 light using legacy T8 fixture.

Burnt my first cable. Very simple mistake, having wire tape the 3 cables together. After observing how my contractor works, i figured out that these cables need to be separated. When AC current runs, it can get qutie hot and short/burn the wires like below.

And using this triangle connector is silly. The expert told me, this thing has nothing to do with installing fluorescent light wiring. Now i see, why i screwed up thinking that this is the connector =.=''

Finally after some advice from experienced bro, and observation i tried again. My chance came quite fast. Right side live, left side neutral and middle earth. Finally succeeded. Proud of myself LOL

Hire cost: 

a) change light RM60 per set

DIY:
a) buy voltage detector ~RM15
b) buy new yellow T5 LED light RM12.50
c) spend time to try ~3 hours on site
Total DIY cost = RM22.50.


Next time i change if i do T8 LED tube, it's ~RM20 as cost per light. LED suppose saves electricity alot more & can last ~15 to 20 years. 


But need invest in drille since standard flourescent light wiring is in middle, LED light can connect on its side. 

In the mean time, invested the RM30+ for emulsion paint and RM20 x2 gloss paint for repainting metal gate & part of house wall. Scraping tool and plaster material + sandpaper costs less than RM10.
The rest is invest own time to make own house nice. Not so bad, at least it's my own haha.

Friday, December 9, 2016

Painting training

1 night training to level up my painting skills with gloss painting. It's quite calming and relaxing to do this while running random songs from Spotify. 

Few things to prepare & some simple guidelines;

a) Buy/prepare some wire brush (wood handle type), scrap cloths and some sand paper to prepare. Clean up dust & brush to roughen up surface - this helps the new paint to adhere easily. Sand paper lightly over the surface and then clean up dust using the cloth which you wet a little first.

b) Prepare to repaint - have gloss paint,  turpentine and some containers with brushes of course. Pour out from can into plastic container and mix a little turpentine to dilute it a bit, but not too much till it's too watery. Place some newspaper to cover the floors or area that might get dripped with paint drops.

c) Paint (duh). Take your time and paint, kind of enjoy the paint. Oh, i do use a face mask, the normal ones you can get from Mr DIY or any pharmacy to keep from directly inhaling the paint fume. Probably bad for health yo.

Result is not bad. It's been more than 10 years since i last painted during my scouting days. Quite satisfying. Gloss paint costs about RM2x, total cost including new paint brush and the wire brush all total to less than RM35. 


Can even paint smooth surface like inside of a wardrobe hahaha.


Let's look for next painting project. Gotta paint em all!

Thursday, June 16, 2016

Sync your history workout from Mapmyrun to Endomondo


Was pondering on what i can do when i decided to hop onto Endomondo app after using Mapmyrun app for a while. So i gave it a long shot, drop the customer service a Request for help knowing that they are now under the same family UA. *Take note these are for Android app


That's quite a surprise now, even after i used my yahoo email for Mapmyrun and my gmail on Endomondo it still worked. Super cool, here is what i did.


1) Login to Endomondo website, sign in. Hover over my profile logo (top right) , a dropdown list will appear.


2) Click My Setting , Add my yahoo email into my profile.


3) From here click Connect. Check the box to include your previous workout.


Below the email reply that i get from Endomondo support team less than 15min after i sent it over.

Mucho gracias Solvi =)


Result of syncing my history. I got back up to my records so far, instead of starting over fresh since this Monday. Kudos and good job Endomondo. 


Now to go on with getfit2016 plan, added another app MyFitnessPlan. Get consistent with 5K target, min 4 runs per week and improve my speed/pace. Not so sure if this really helps yet.

pilot run: DIY homemade peanut butter


Been reading on how to DIY your own homemade peanut butter. First few steps i forgot to take some photos. It's to wash the peanuts, then sun them for few days with the skin intact. Then roast it using the bread maker Joyoung brand we have for 25min. Setting #13 and set to 25 minutes, press start then chill while work is being done.

The hardest part is peeling the skin from the nuts. By theory, we should be able to sieve it traditional style using a flat tray and tossing it like a pro.

Like this; 


Didn't work out well, or maybe im using the wrong tool, a container instead of tray. Will end up with too many peanuts on floor. So what i did was use the bottom of a cup to press the peanuts, this sort of remove majority of the skins and then rub the peanuts to peel completely and at same time remove rotten ones. Quite a chore. Finally to separate, i end up tossing them nuts in container and blowing the skins by mouth. Ouch, messy dirty and hazard to eyes...i think this might work with a fan. Wasn't thinking much and was trying to get it done haha.


Next comes the fun part. Blend them nuts. It takes a while to get them here.

Then to a more creamy state. Suppose we can add some sugar and oil to make the texture more smooth. And somewhere i read on the net before, we can blend one small part slightly and keep aside as the crunchy part. Mix back to your creamy blend at the end.

Not really what i expect yet. Was blending into midnight time, so i stopped here. There is this point of magical creaminess where you blend long enough, i guess you will probably get the off-the-shelf type of creamy peanut butter jam. It's almost there this time.

Well, ran out of flour to make bread. Oh dear, will try out & come back next time again to make an improvised version. Oh ya, do keep refrigerated since it's pure peanut with no preservative. Probably last only 3-4 days. So till next time for pilot #2. :)

Btw, this is pretty smart. But maybe can borrow this idea haha or practise & perfect the tossing tray method =_=


Tuesday, May 31, 2016

Get Metered Taxi at KLIA 1


As a service to my taxi guy yesterday. Nowadays Grab/Metered taxi guys can now pick up passengers from airport. They were prohibited from doing so not too long ago (last year i think). 

Just drop this fella a whatsapp message if your destination is around Sg Long/BMC/Balakong area as he stays near this area. He charges a standard start rate of RM3 and the rest by normal metered rate. Depending on traffic jam i guess and this green buggy he drives can fit 4 check in sized luggage which will be helpful if you happened to need bigger taxis.

It's nice to know that your taxi is already arranged before you even arrived in airport. I messaged him 1 day before flight time & gave him flight information (he needs this to register with airport counter). Just drop down to Level 1 from arrival hall (Level 3). There are also metered taxis waiting at this area. At least airport transfer is not as expensive as airport limo now.

Wednesday, April 20, 2016

SaltMarsh Running tips - Belt buckle, Belly Button, Ninja & Quick steps


Just sharing out again this simple, effective tips of "Belt buckle, Belly Button, Ninja & Quick steps" by SaltMarsh (click link to read full details).


Belt buckle.

Shoulders back, hips forward, head up, show their belt buckle off to the world.

Belly button.

Don't to let your swinging hands cross the midpoint of your body


Ninja.

Try to run quietly, and you’ll find that you rise up on your toes a bit, shorten your stride, and gain better control of your body. Ninjas move quietly. Try running like a ninja to improve your running economy.

Quick steps.

One of the most difficult things to learn as a distance runner is to shorten your stride and focus on quick steps to minimize injury. If you shorten your stride and focus on a quicker turnover you’ll be lighter on your feet and run longer with less effort. This is most apparent on hills. 

Friday, April 1, 2016

DIY your own playdough for toddlers


This DIY recipe to make playdough is from my wife. It's natural ingredient and practically much more harmless than whatever play-dough or Plasticine you can get from marts.
The step by step as written by her shared here:


Update: no need store into fridge. Salt keeps them lasting in room temp.


1/2 cup salt, 1 cup flour, 1 cup cooking oil. Mix well.


                                                  Add water color as described above.


Cook for 5 min, medium to low fire. 

Knead with spatula.

Ready for play!

Store in glass container, can last for months.

Video from Play-Doh.


.now try to make Olaf XD

Thursday, March 31, 2016

DIY: Easy home made yogurt recipe


This is my MIL's recipe for making yogurt using NEWLIFE yogurt maker. Really simple recipe & steps to making very good & healthy probiotic snack. Many commercial yogurt use alot of preservative and artificial flavoring, so if you really need to buy from marts, please check out the ingredients and be aware of what you are getting in your yogurt.

The recipe uses: 
a) the Jug & maker from the NEWLIFE set
b) organic soy bean powder
c) any sieve you have and water
d) ready made yogurt ~25ml OR yogourmet starter.


General steps outline:


a) 800ml water, add 12x spoonful soy bean powder, stir & sieve


b) add some water to starter, OR use last batch yogurt as starter (your existing probiotics army)


c) stir again, place into maker & turn on power for 10-12hours. 


Illustrated steps below:


800ml water the jug, look at it's marker. Add 12 spoonful of organic soy bean powder.

Stir well until they mix together.

Sieve out any blobs to avoid yoghurt lumps. Transfer back to jug.

Add the starter & stir, if your last batch of yogurt is kept, they can be used as starter as well up to 10 times. Really save up the cost of starter with repeat use.

Put the cover of jug on.

Place into maker, & turn on. Takes about 10-12 hours to be ready although the recipe book says 8hours. Newlife yogurt maker, see link for more details

Done. Who says making yogurt is hard? Serve after refrigerate with some black sugar/molasses/soaked chia seed/with fruits/make yogurt shake. This is arguably the best-tasting and easiest home made yogurt , baby E loves it & keep asking for more. 

At this point, you can store up ~25 to 50ml in small container of yogurt as starter for next time use.

That's it folks for this post.

Other related readings that may interest you:

http://www.mapi.com/ayurvedic-knowledge/food-tips/health-benefits-of-fresh-made-yogurt.html#gsc.tab=0
Freshly-made yogurt is filled with countless numbers of beneficial bacteria that help digestion and kill harmful viruses
Store-bought yogurt is cold, heavy, difficult to digest and can cause the finer channels, or shrotas, of the physiology to become clogged. Also, once the yogurt has been refrigerated, the quantity of friendly bacteria decreases and thus the health producing benefits are less.
benefits from fresh yogurt include decreased bloating, as well as relief of both constipation and diarrhea and other stomach disorders.

http://blog.radiantlifecatalog.com/bid/63303/Homemade-Yogurt-in-4-Easy-Steps-Benefits-of-lacto-fermentation

http://www.sheknows.com/food-and-recipes/articles/973731/why-you-should-make-your-own-yogurt

http://draxe.com/probiotic-yogurt/